Monday

Moroccan Stenciled Steps

These were the stairs before we started
As you can see we painted 2 sets blue, 2 sets white and so on....


The customer had ordered 4 Moroccan styled stencils that we would do in alternating colors.


The first day we just did the blue steps. It took us awhile to get a groove going.


We realized quickly that we needed to cut the stencils down so they fit the steps. This cut down on our painting time (and fussing with the stencil time).


Two of the stencils had very thin lines so, when we were finished stenciling we had to go back with a fine paintbrush and touch up where the paint bled underneath the stencil.


The finished piece was beautiful! We were just as excited as she was! I might even do this in my own home I liked the finished product so much.


I must admit, our backs are killing us (sitting on a small step, twisted around isn't comfortable)! Maggie's shoulder had the funkiest spasm going on all day and my carpal tunnel is flaring up, but it was so worth it!


Tuesday

Wallpaper Take Down

In all the years as 2 Women and a Paintbrush we’ve taken down a lot of wallpaper! It can be a challenge. Usually, the walls haven’t been properly prepped, which makes the take down difficult, but Maggie and I are always up for the challenge.


The hard thing to determine when we go on an estimate, especially if the homeowner is not the person who put up the paper, is how many layers there are and how the paper was installed. Pretty much it’s a guessing game; we never really know what we’re getting into until we start peeling.

Sure, we can guess. If the paper is peeling back, maybe we can see if there is another layer, but really we don’t get the whole gist of it until we are up to our knees in paper.


Once we peeled back the first layer we quickly discovered there was a second one. The first one came off fairly easy, but the second, oh the second, took a lot of patience.


Fortunately, there was not a lot of repair work on this wall.


We sealed it with a Zinsser clear sealer, because it locks in any leftover glue residue or paper fibers and fills in small nicks.


We left it to dry overnight, came back the next day and started painting.

The end result was amazing! When we are in the midst of the takedown it’s hard to imagine it’s going to look so fresh and clean.


Our next phase is a wonderful Moroccan stencil on the stairs in Navy Blue and White. We will be altering the steps in color (Navy with a white stencil & White with a Navy stencil) and 4 stencils. It’s sure to be amazing, so you’ll have to stay tuned!

Saturday

Doing a Faux finish is always fun. No two are ever alike, which makes it fun, but boy can they be draining, especially when they are on the ceiling.


This ceiling was rather large so it took two days to complete. It had many nooks and crannies. Bending backwards really did a number on my back, but the good thing was it was low enough that I didn’t have to use a ladder.


The ceiling already had a base coat of Ralph Lauren River Rock paint (Garden Wall RL RR51), which was pretty fresh, so the customer decided to just do the suede treatment right over that. So, we took Ralph Lauren Suede paint (Plaza Blanca SU51) and brushed it on with a 6” brush.


We worked in small sections, blending our large “X” marks as we went. We were careful not to completely cover the entire base coat though, because leaving small areas of the under coat (tan) exposed, creates the crushed suede look.


The ceiling treatment complimented the suede treatment that was already on the walls; Ralph Lauren (Yellowstone SU84 & Ranch SU85).

For more fabulous colors and ideas visit the Ralph Lauren website: http://www.ralphlaurenhome.com

Thursday

From Paper to Stripes

Way back in the 80’s when “big hair” was in, “Take on Me” by Ah-ha blared across the radio and MC Hammer pants were a must have, wallpaper was all the rage.


Maggie and I enter into many homes where people say, “What was I thinking!” But back then, wallpaper was in. Now, 20 years later we’re getting many calls to, “PLEASE! COME TAKE IT DOWN!”

Customers will often ask us, “Do you like taking paper down?” Our answer, “Yes!” I know, I know, we’re crazy right, but it really is the one of our favorite (job related) things to do.

We have run into paper that takes days to remove. Little tiny pieces, one by one, painstakingly removed by hand! Okay, so those jobs aren’t much fun, but others come down in whole sheets, just like butter and those are a blast. But about 75% of wallpaper removal jobs we do fall somewhere in the middle. Medium sheets are peeled off, usually taking a couple hours to a day to remove.

Maggie and I usual race each other, seeing which one can get the paper off first, and if I had to be honest, she usually wins. She’s much more patient then I. And you know, that’s our secret weapon in wallpaper removal.

Over the years we have heard about and tried A LOT of recipes, concoctions, and techniques to remove paper. Some we’ve made from scratch and some we bought at the hardware store, but nothing has worked better than a whole lot of patience (and some water).

Maggie has become a master at prep work too. Let’s face it, most of the time people put the paper up because the walls looked terrible in the first place! Plus, no matter how good you are at taking paper down, there is always going to be “stuff”, that’s why the prep work is so important.

As you can see from the after pictures, Maggie does a fantastic job at masking all the imperfections.

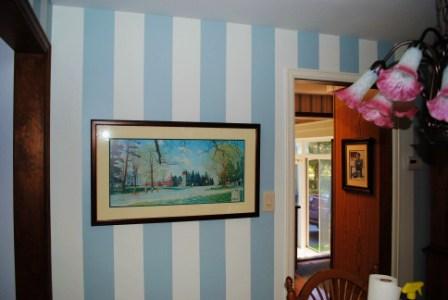
Wendy opted for stripes in her dining room, looking for a way to join her family room (blue) and living room (green). We removed the paper, prepped the walls, and painted a base coat of Pittsburg: Dove White, and let it dry over night. The next morning we made 5” stripes using Frog Tape http://www.frogtape.com/ and then painted the stripes with a small chubby roller using Smoke 2122-40 by Pittsburg Paint (http://www.ppgpittsburghpaints.com)

A very classy end result I think.

We also redid her upstairs bathroom.  Again, the paper had been up for years. This paper took a little more time to come down.  Usually that's the case in a bathroom anyway, because the steam and moisture causes the paper and glue to contract and react. She used the Smoke in this room as well.


Wednesday

A Buffalo Bills Room For Jack!

Recently, an old friend of Maggie’s, whom she had reconnected with via Face Book, asked us to redo her son’s room. She knew she wanted something fun and something that would grow with him. She also wanted COLOR!!!!

After talking it over with Jack (who is just the cutest lil’ thing) they decided they would like to do a room with Buffalo Bill colors. Maggie was all over it! Even though she is a die- hard Dolphins fan, you can still find her cheering for the Bills on any given Sunday. Plus, most of the time we get the task of redoing a girls rooms (which I totally am all over)so when she had the opportunity to do “boy stuff” she was pumped!

After showing us a picture from a painting brochure, we all agreed that a stripe would be the way to go for this redo. Coupled with the color choices, it was masculine, versatile, and a complete transformation.

Now, even though we opted for just a lighter shade of grey on the ceiling and wall, because we didn’t want the room to become too dark, the red and blue were dead on to the colors in a Buffalo Bill uniform.

Of course we had to prime the red, yet it still took 5 coats of paint to get the finale finish! REDS DRIVE ME CRAZY! They look spectacular when they are finished, but man, are they a pain in the butt to do. And the reason why is this; because there is so much dye used in red tones there is less paint in the can. So, it takes many more coats to achieve the final product. When we were done painting red, we then brought the gray down to meet it. It wasn’t an even split either, we had to bring the red up higher and you’ll see why.

The center line was going to be the navy blue, with thinner red stripes, so in order to achieve that look and save ourselves time; we painted the red up higher, taped off the lines (using Frog Tape) and painted the rest in blue. When the tape was pulled off it revealed two smaller red lines. Painting the base coat of red higher made it easier for us because we didn’t have to try to go back and paint within the lines.

I found with acrylic painting you always have to work from the bottom up. You really have to think through your design and plan it before you start; otherwise you’re going to create a lot of extra painting for yourself.

This is what Jack had to say about his room, “Give me a minute…AWESOME!!!!!” We are so glad he was happy; we had a great time creating it!